Zbrush:複数UVの取り込みと編集

Dazフィギュアのように、1つのフィギュアが複数に分かれたUVを持っている場合のテクスチャの転送の仕方。

1 フィギュアを読み込んだら
Tool >Polygroupsメニューから「Auto Grops With UV」をクリック。
右のタブ脇のポリフレーム表示に切り替える。
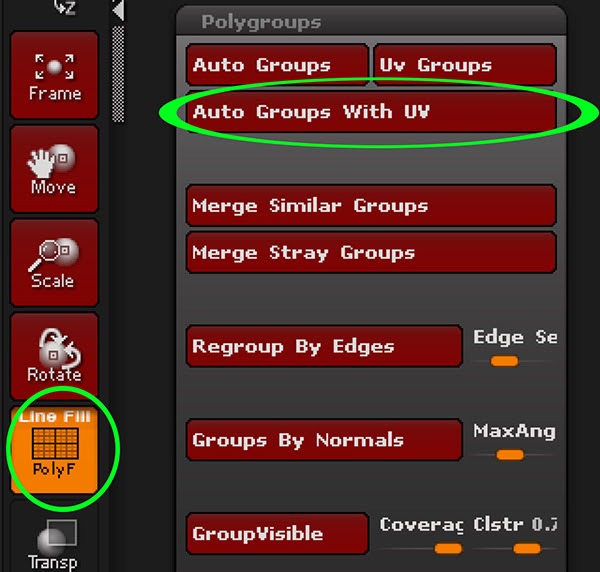
[peg-image src=”https://lh3.googleusercontent.com/-V0KYFxshLZ0/WnwfyNt992I/AAAAAAAA5wA/4o2sZal1qXktcJ_YZbnZbsOcCyeNea4UwCCoYBhgL/s144-o/ztex-0002-2.jpg” href=”https://picasaweb.google.com/109425650485415836391/6519222954477215633#6520121308062021474″ caption=”Daz StudioからZbrushへ2-1″ type=”image” alt=”ztex-0002-2.jpg” image_size=”600×572″ peg_single_image_size=”w400″ ]

ポリグループごとに色分けされる。
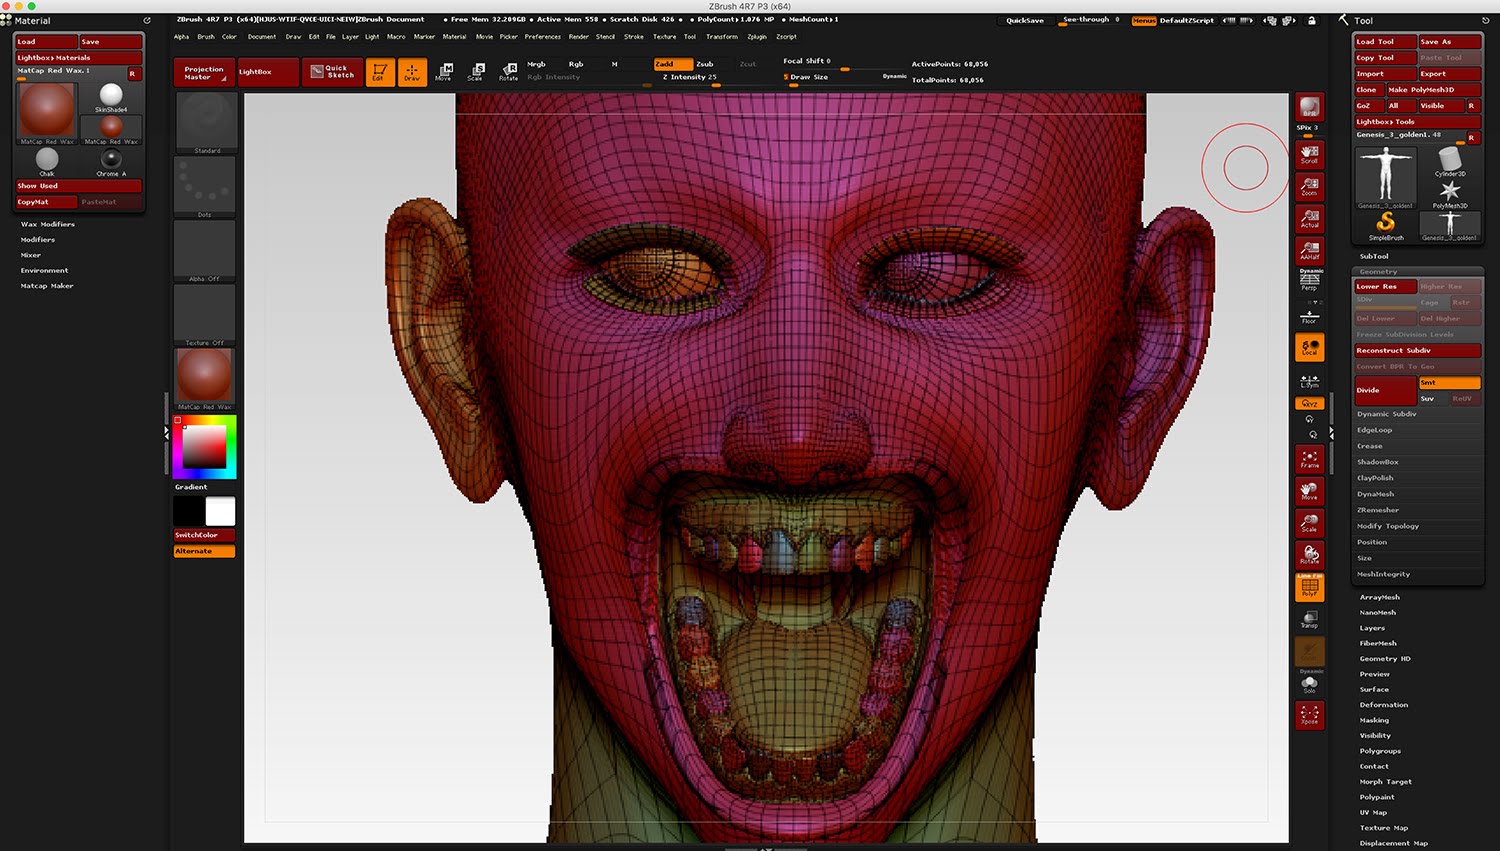
ただし、左右対象の部位(腕、足、目等)や歯や爪などの同じ形状をクローンしたような部位は別ポリゴンとして認識されてしまう。

[peg-image src=”https://lh3.googleusercontent.com/-oERL0mf8wAY/WnwplW96UEI/AAAAAAAA5xA/-RvxrKVMRgMz83ZvQUGhsl4i1hrVhtMDwCCoYBhgL/s144-o/ztex-0004.jpg” href=”https://picasaweb.google.com/109425650485415836391/6519222954477215633#6520132082322788418″ caption=”” type=”image” alt=”ztex-0004.jpg” image_size=”1500×851″ peg_single_image_size=”w500″ ]

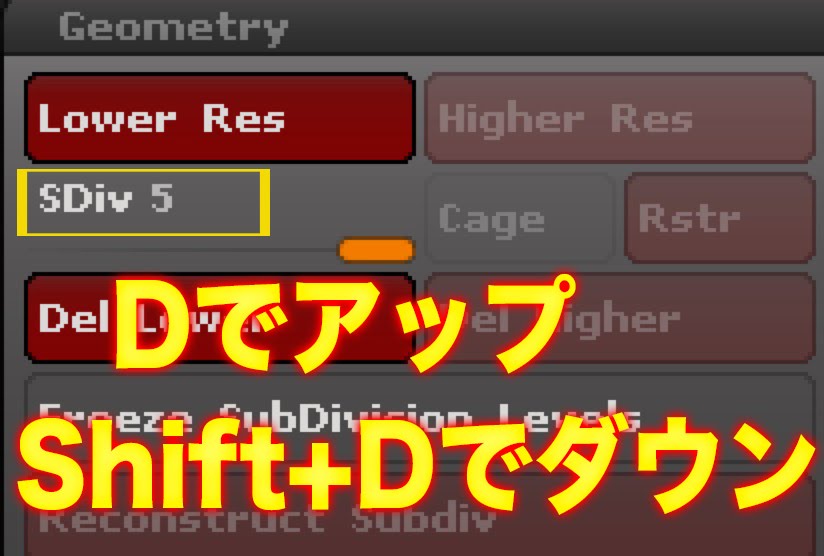
2 Tool >Geometryメニューで解像度を上げる。
「Shift+D」のショートカットで数値をあげていく。

[peg-image src=”https://lh3.googleusercontent.com/-gIa1Dl66N9E/WobG20WqSTI/AAAAAAAA6SI/gA6KiUyE_fUAEACsRZViyy9_V5BiA1iRACCoYBhgL/s144-o/z-sdiv.jpg” href=”https://picasaweb.google.com/109425650485415836391/6519222954477215633#6523119755361667378″ caption=”Daz StudioからZbrushへ-1″ type=”image” alt=”z-sdiv.jpg” image_size=”824×556″ peg_single_image_size=”w400″ ]

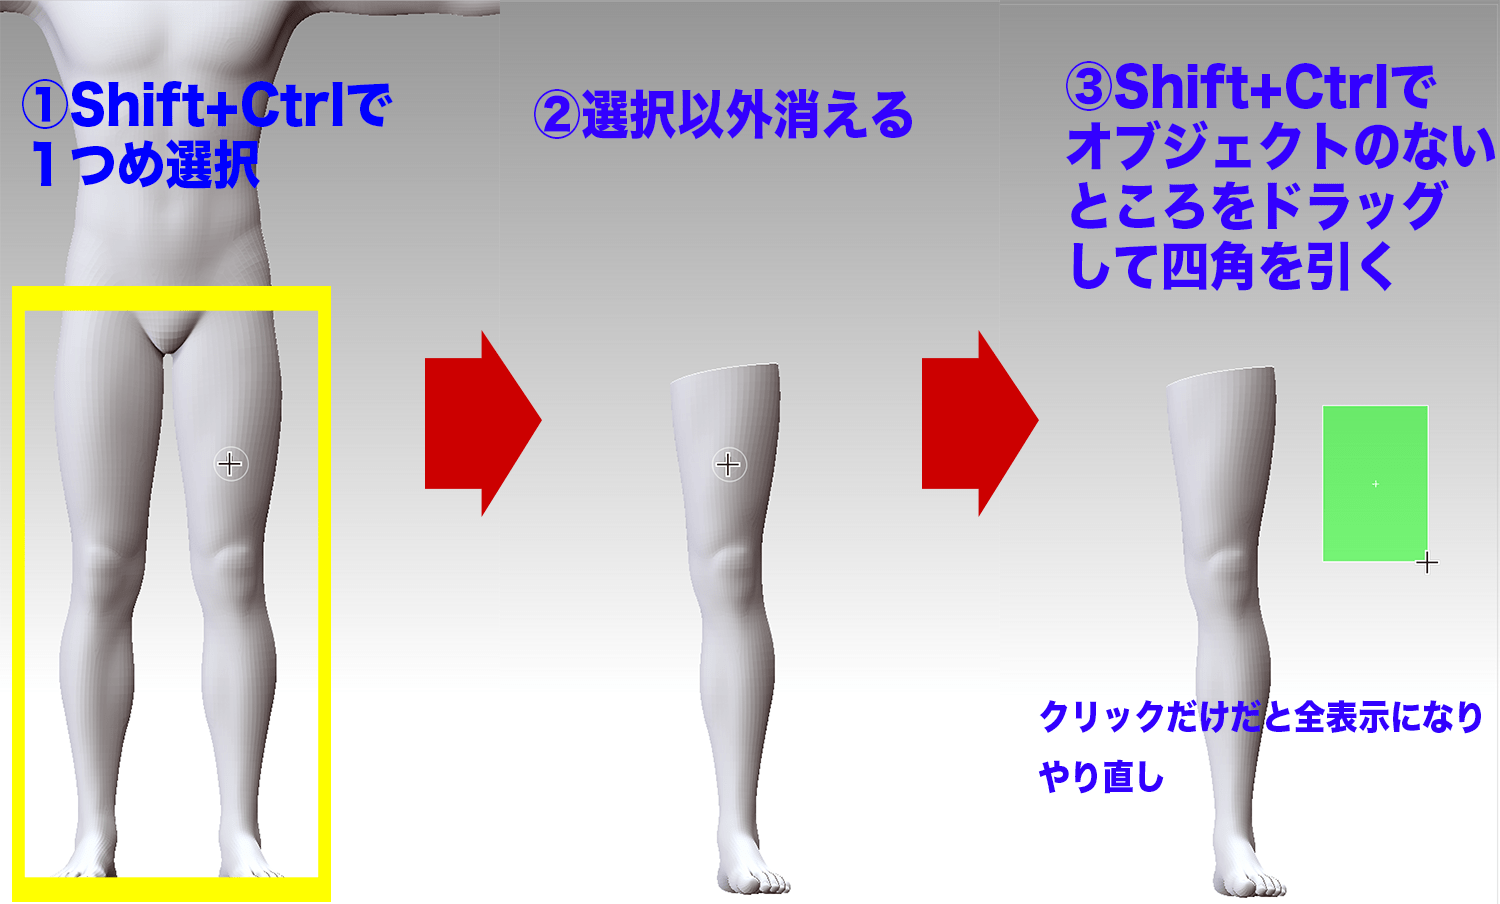
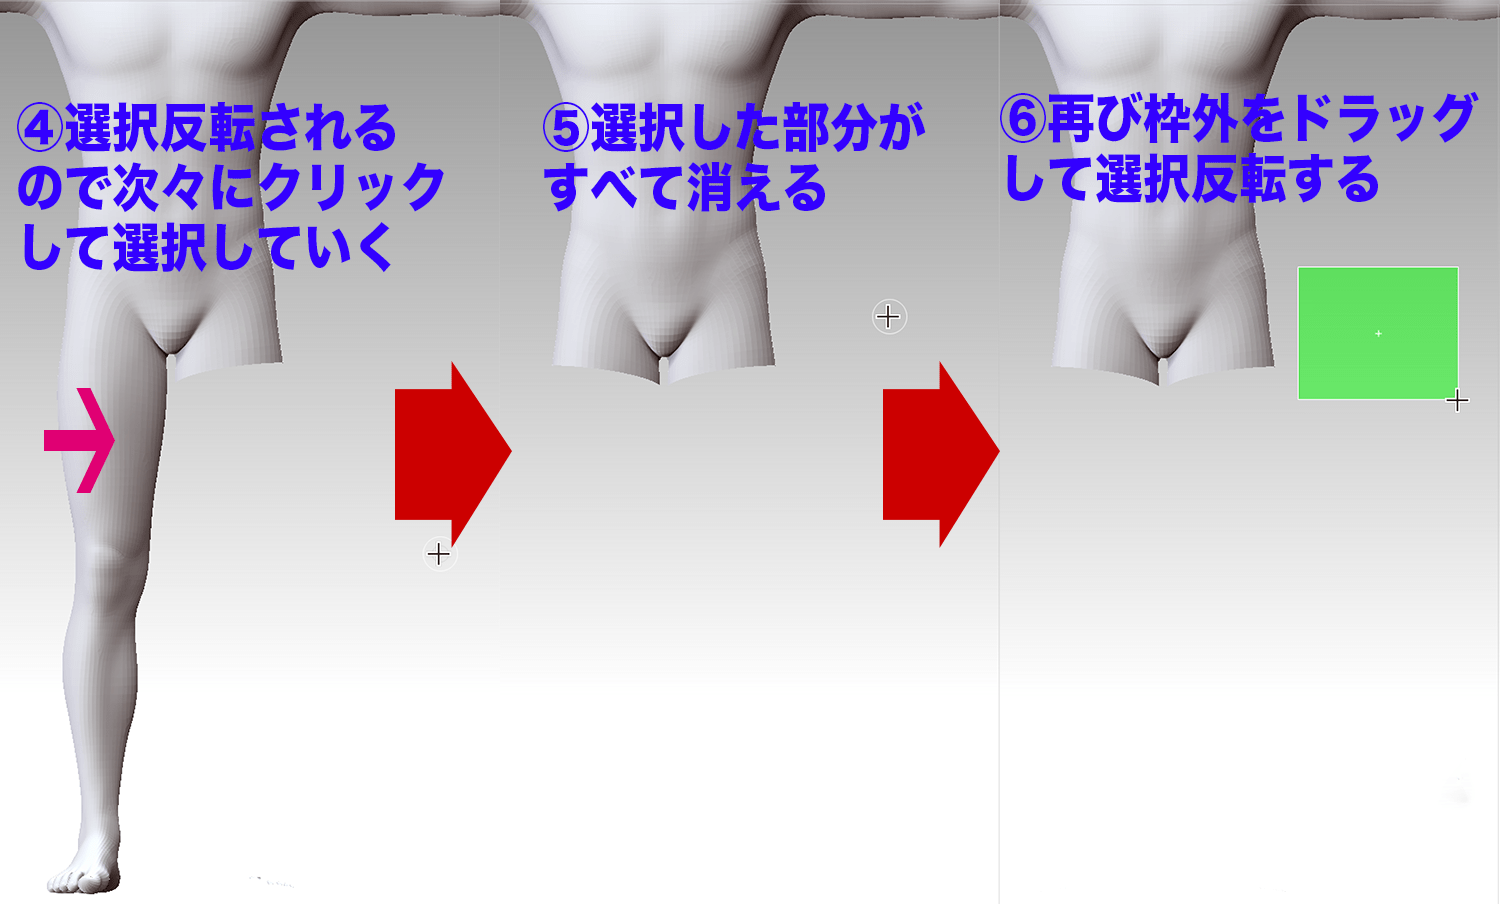
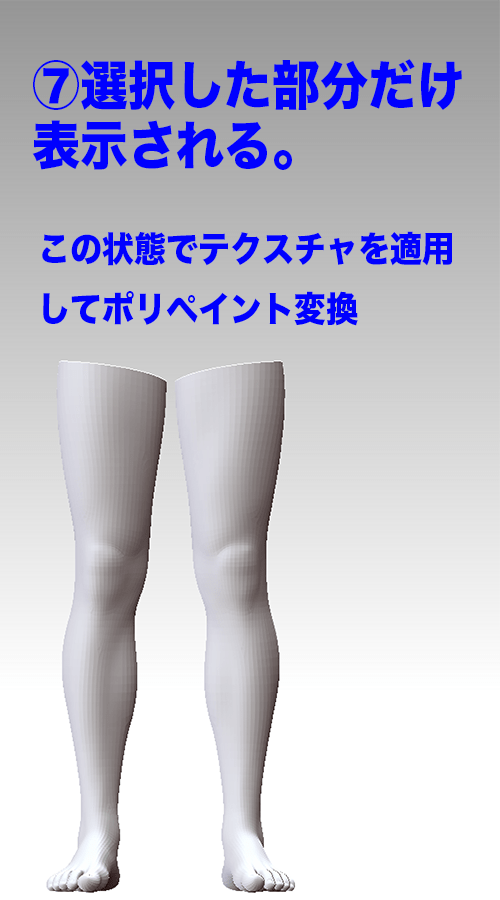
3 ポリグループごとに対象だけ表示した状態にする
この時1で本来同じテクスチャマップなのに分割されてしまったグループを同時選択するには

[peg-image src=”https://lh3.googleusercontent.com/-FC_J8gJwt6k/WpmKfGO-KEI/AAAAAAAA6tE/h7-Y8fMPf-s_xnkXS26wXn-mJdYKgQB9ACCoYBhgL/s144-o/many01.png” href=”https://picasaweb.google.com/109425650485415836391/6519222954477215633#6528401401704228930″ caption=”テクスチャからNormal Mapを作る1″ type=”image” alt=”many01.png” image_size=”1500×904″ peg_single_image_size=”w600″ ] [peg-image src=”https://lh3.googleusercontent.com/-lDpovjrVXdI/WpmKfJhWKVI/AAAAAAAA6tE/tuQ99jZdgp8RpWHpdx_2mjbPjPdkLD4PQCCoYBhgL/s144-o/many02.png” href=”https://picasaweb.google.com/109425650485415836391/6519222954477215633#6528401402586605906″ caption=”テクスチャからNormal Mapを作る1″ type=”image” alt=”many02.png” image_size=”1500×904″ peg_single_image_size=”w600″] [peg-image src=”https://lh3.googleusercontent.com/-7h2cPdNIdRg/WpmKfNk-j1I/AAAAAAAA6tE/f1A_4bZ_VIcxHB-ajoHXCw9fCAiJrtQbQCCoYBhgL/s144-o/many03.png” href=”https://picasaweb.google.com/109425650485415836391/6519222954477215633#6528401403675578194″ caption=”テクスチャからNormal Mapを作る1″ type=”image” alt=”many03.png” image_size=”500×900″ peg_single_image_size=”w200″ ]

4 テクスチャを読み込んでいく。
例えばまず、顔だけを残して全部非表示とする。
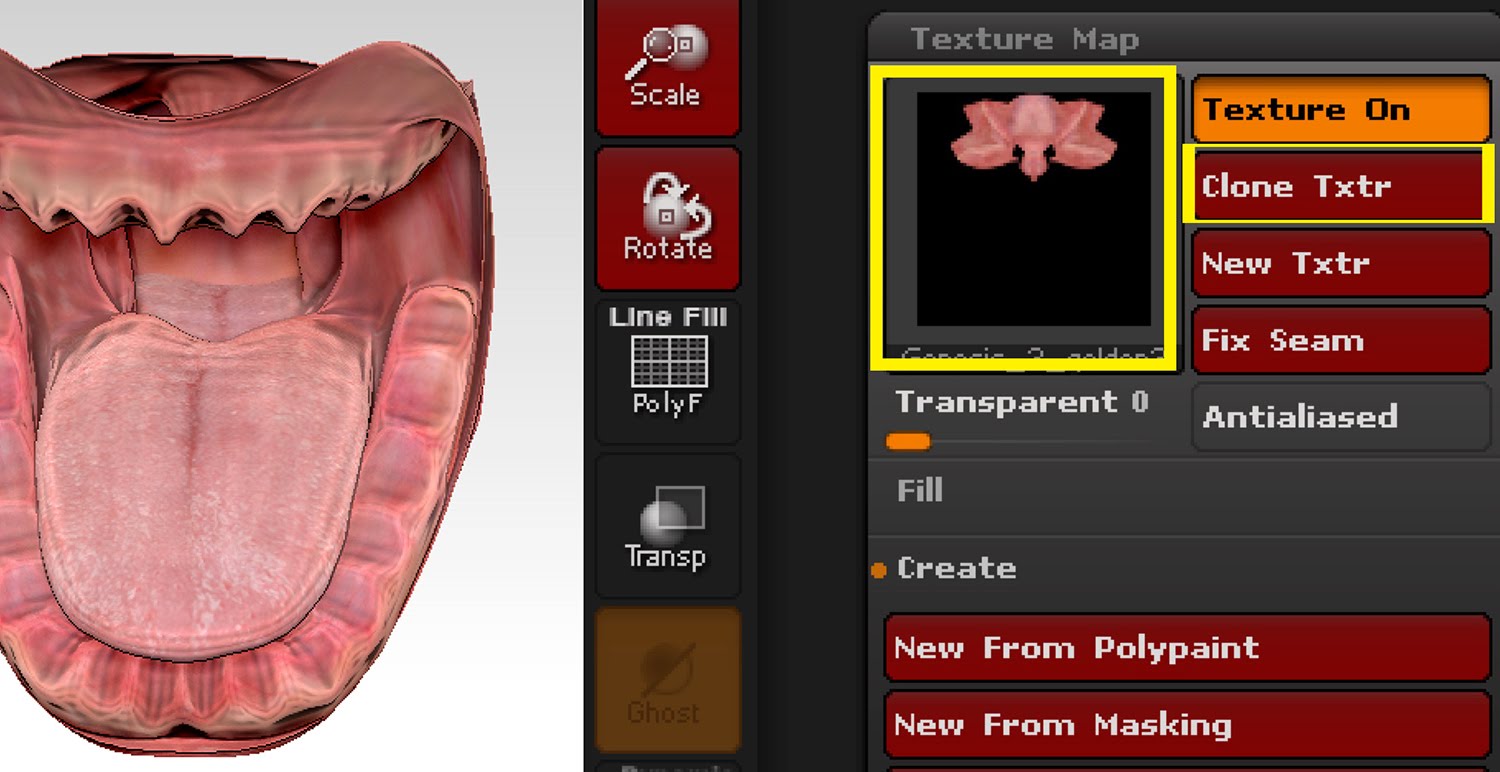
Tool >Texture Map から顔のテクスチャを読み込む。

[peg-image src=”https://lh3.googleusercontent.com/-fleJnXitlrc/WnxAyHf36WI/AAAAAAAA5xw/Hhnx197-B-0l7DYsTIW-YxnNiRJlnVZFACCoYBhgL/s144-o/ztex-0005.jpg” href=”https://picasaweb.google.com/109425650485415836391/6519222954477215633#6520157590276008290″ caption=”Daz StudioからZbrushへ5″ type=”image” alt=”ztex-0005.jpg” image_size=”1500×1261″ peg_single_image_size=”w600″ ]

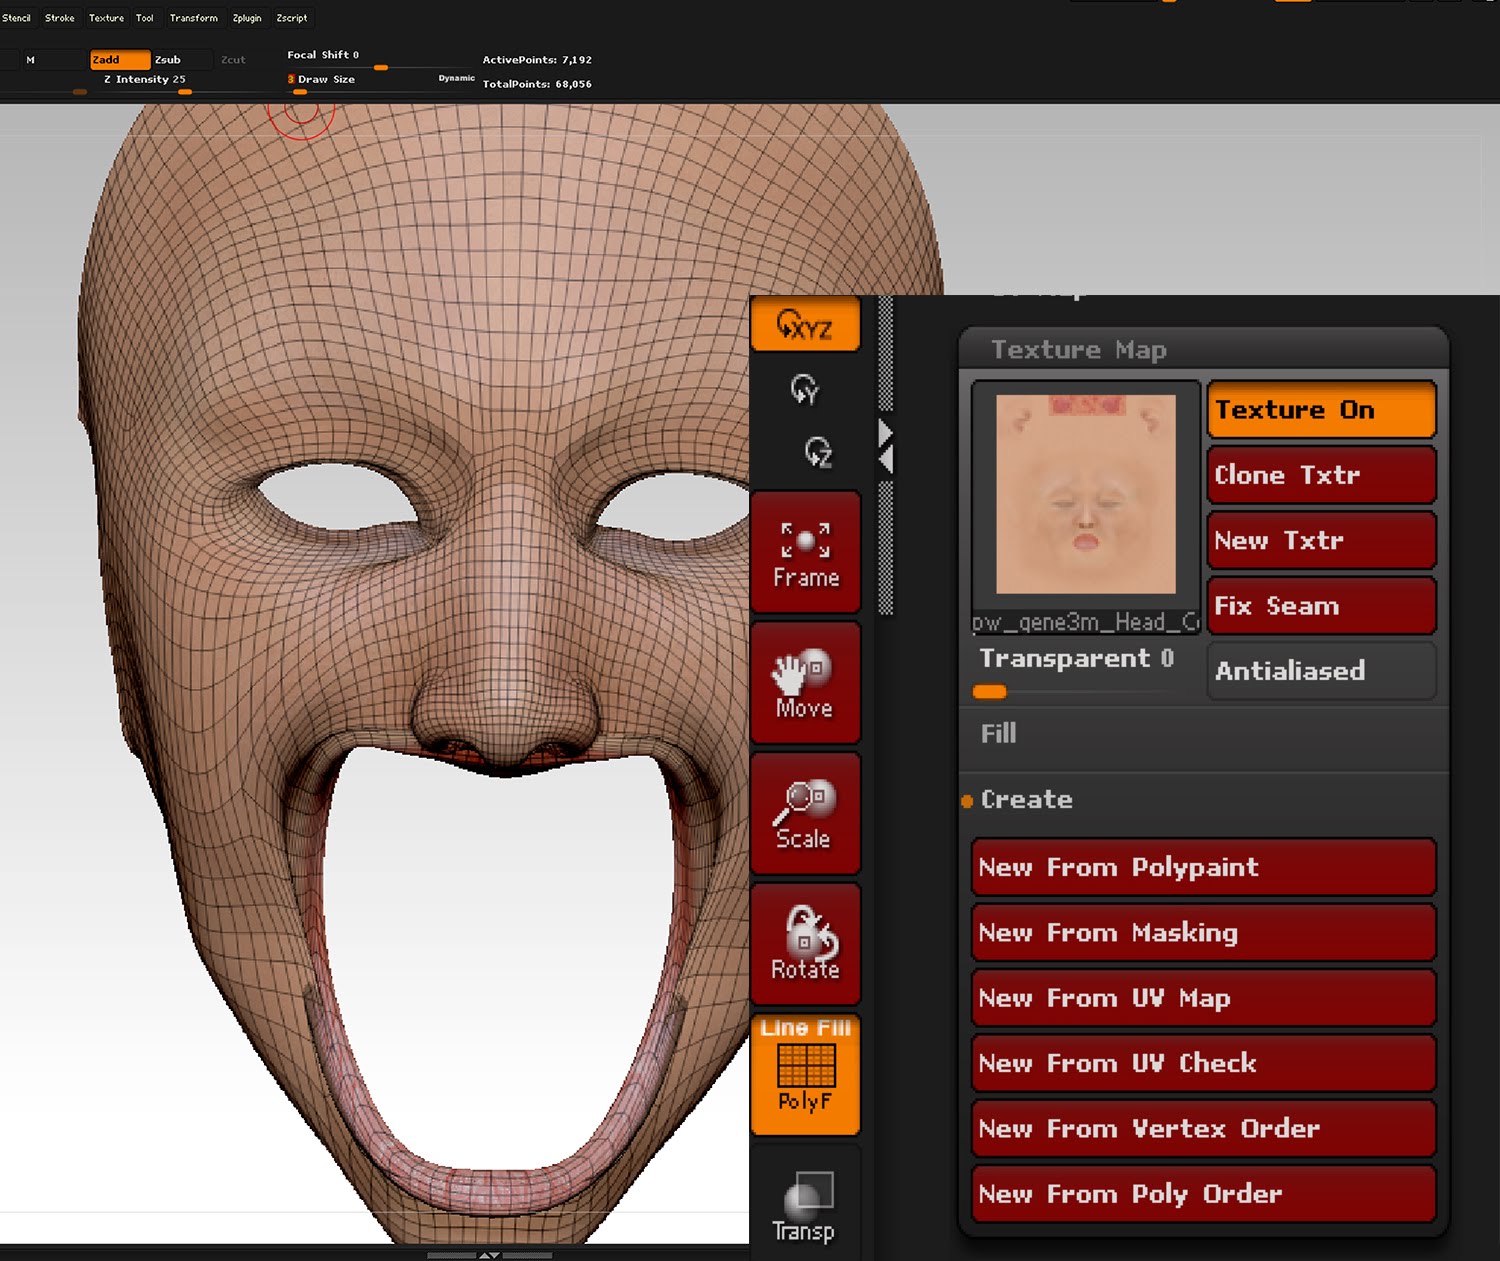
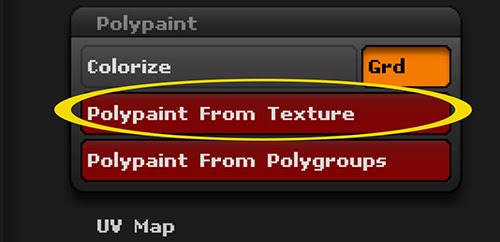
4 Tool >Polypaint タブの下にある「Polypaint From Texture」をクリック。
テクスチャはシームのないポリペイントに変換されます。

[peg-image src=”https://lh3.googleusercontent.com/-gs3xhLFok8s/WnxLMNWFpuI/AAAAAAAA5yo/P-lifWCVW5A2h_Wbm_yWQKmlG57XEYuwACCoYBhgL/s144-o/ztex-0005_2.jpg” href=”https://picasaweb.google.com/109425650485415836391/6519222954477215633#6520169033638455010″ caption=”Daz StudioからZbrushへ5-2″ type=”image” alt=”ztex-0005_2.jpg” image_size=”500×242″ peg_single_image_size=”w400″]

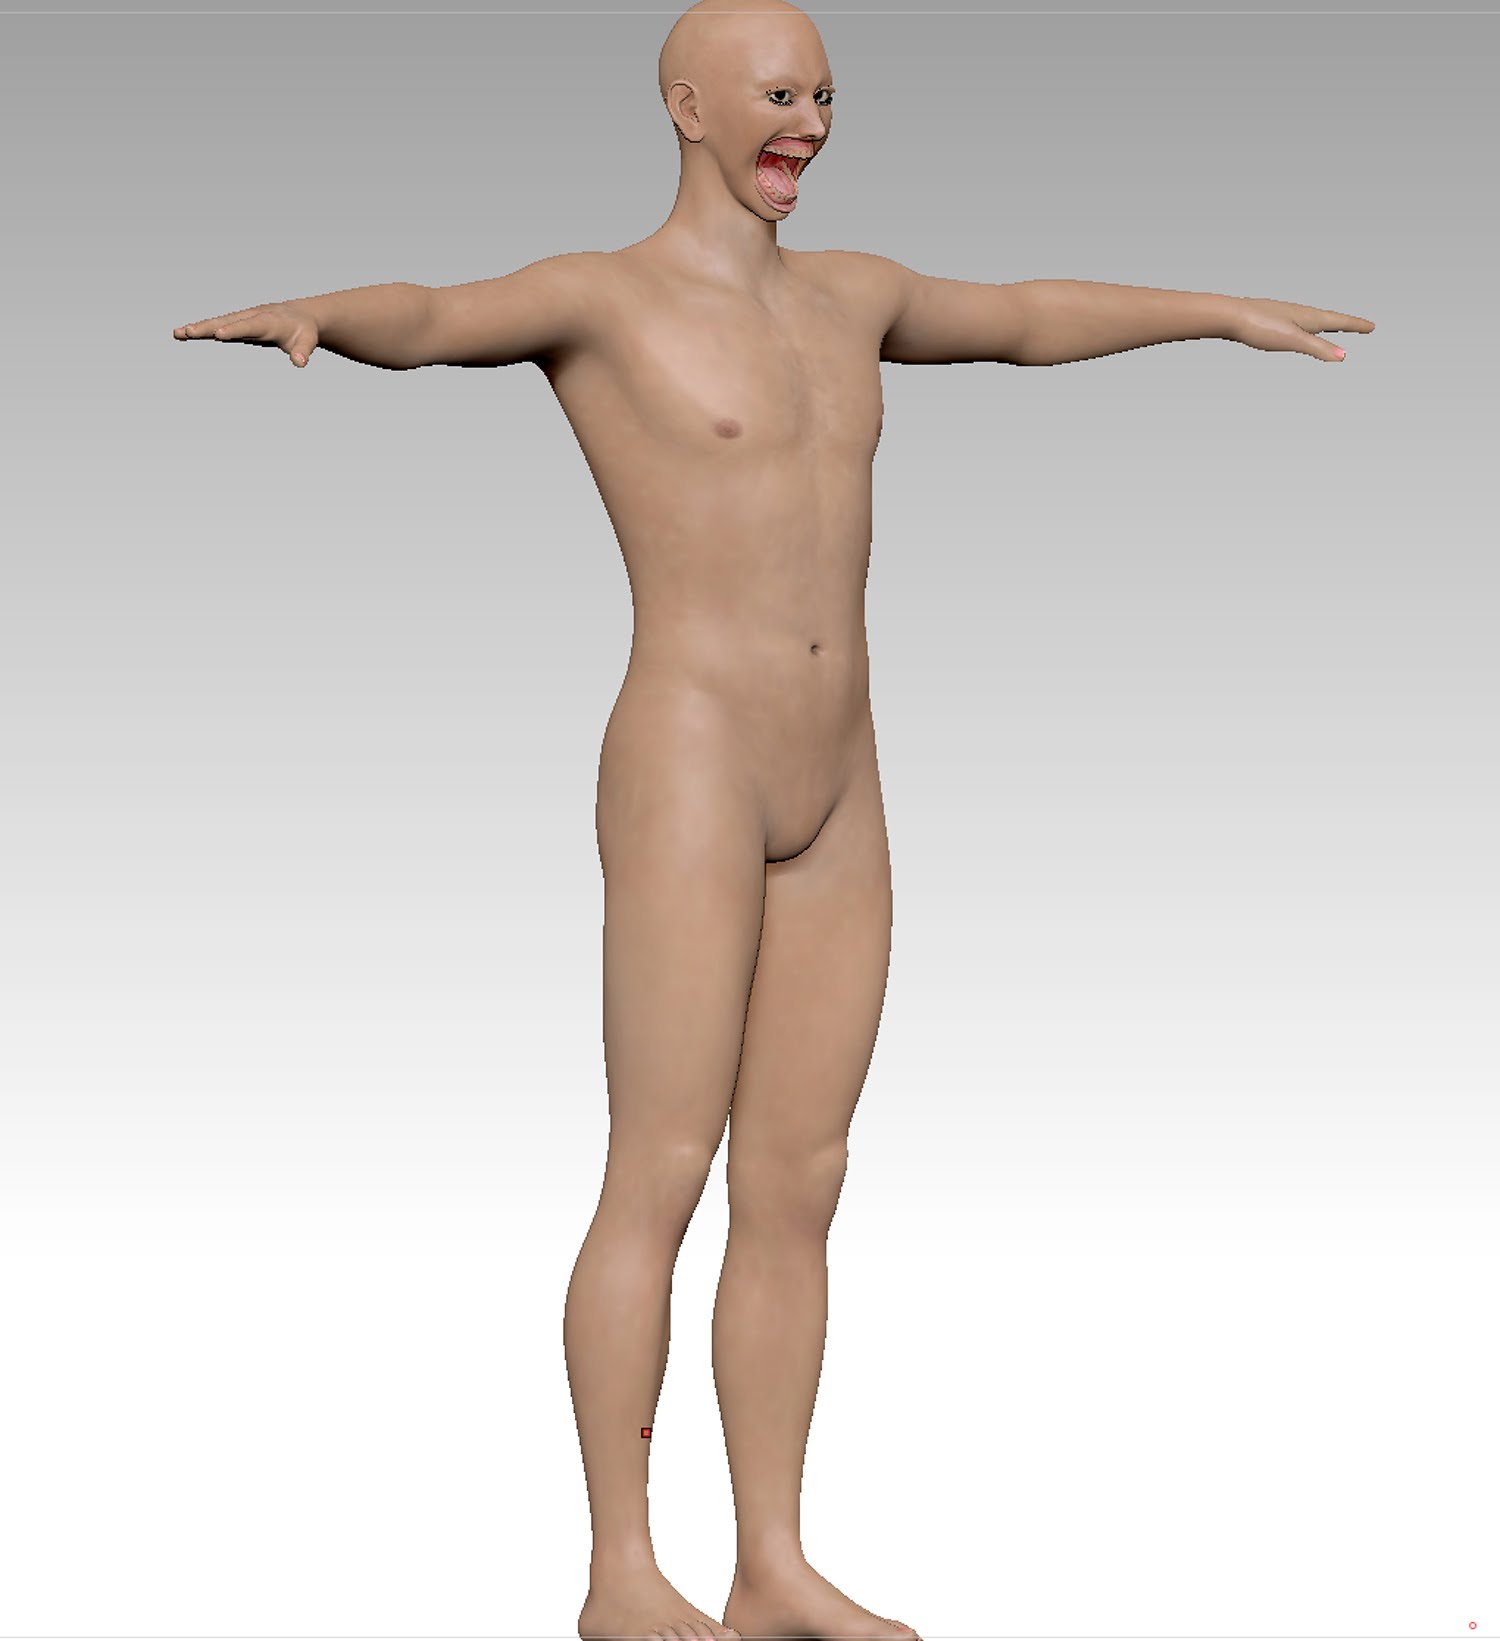
5 この3、4の作業をパーツごとに繰り返して全身をポリペイント化する。
上部パネルメニューにあるボタン(通常Mrgbになってるかも)を「Rgb」に切り替え、右隣のZaddボタンをオフにする。

[peg-image src=”https://lh3.googleusercontent.com/-abSAycHfnj0/WobG24F5bHI/AAAAAAAA6SI/ySqBe1GHqDI6skSd0BNptpJAeFq3aWoOgCCoYBhgL/s144-o/dz-paimted.jpg” href=”https://picasaweb.google.com/109425650485415836391/6519222954477215633#6523119756365098098″ caption=”Daz StudioからZbrushへ-1″ type=”image” alt=”dz-paimted.jpg” image_size=”1500×1641″ peg_single_image_size=”w400″ ]

6 ここで直塗りやZAppLinkやSpotlight機能などでテクスチャを編集後エクスポートの準備をする。
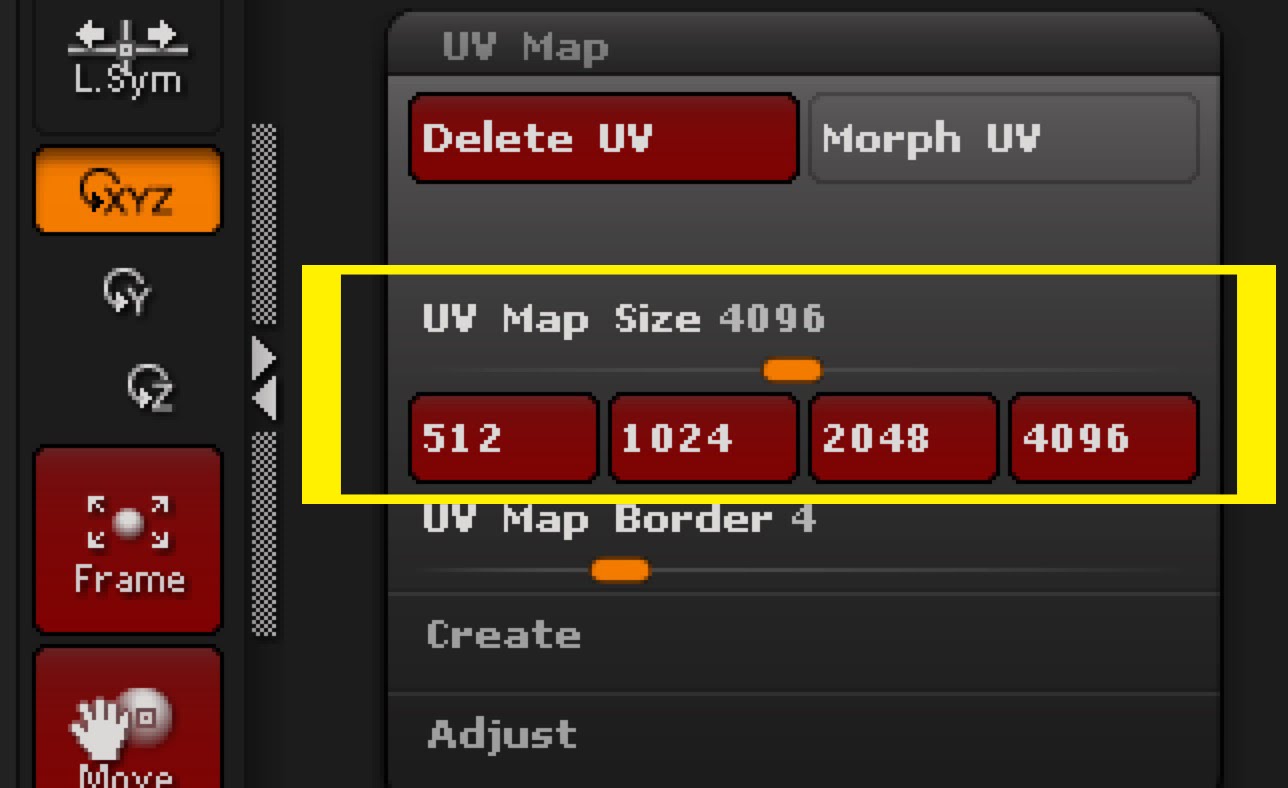
書き出す画像サイズは、Tool >UV Map で調整できる。(現行Dazモデルはだいたい 4096 pixl)
ポリペイントをテクスチャに焼き付ける前にUVサイズは設定しておく必要がある。

[peg-image src=”https://lh3.googleusercontent.com/-pR1PI361trQ/Wo1zdzHjfII/AAAAAAAA6i8/68r6nmsM4qwxXlfVgZ4TMXjQ5t0kU3dxgCCoYBhgL/s144-o/z-texexpsize.jpg” href=”https://picasaweb.google.com/109425650485415836391/6519222954477215633#6524998390905011330″ caption=”Daz StudioからZbrushへ-2″ type=”image” alt=”z-texexpsize.jpg” image_size=”1288×788″ peg_single_image_size=”w400″]

7 ポリペイント化した時と同じ要領で、schift + ctrlで 選択して1枚のテクスチャにしたい部分だけを表示した状態にする。
Tool >Texture Map の下部にある「Create」の階層を開き、一番上にある「New From Polypaint」をクリックする。

[peg-image src=”https://lh3.googleusercontent.com/-3WzLqDFlxcI/Wo1xlCSUNeI/AAAAAAAA6ik/5-rkexUFT5cplacEGe3wjD0MpSqtdcJvgCCoYBhgL/s144-o/z-texexp01.jpg” href=”https://picasaweb.google.com/109425650485415836391/6519222954477215633#6524996316212508130″ caption=”Daz StudioからZbrushへ-2″ type=”image” alt=”z-texexp01.jpg” image_size=”1288×1023″ peg_single_image_size=”w500″]

8 するとポリペイントからテクスチャに焼き付けされ、Texture Map の「Texture ON」ボタンがアクティブな状態に切り替わる。
そのすぐ下にある「Clone Txtr」をクリックすると ビューポートの反対側に複製される。

[peg-image src=”https://lh3.googleusercontent.com/-Vv95o213j-Q/Wo1xlK6FagI/AAAAAAAA6ik/Ns4tpx-gxQst7vWE4etDg6iczklWxtJnACCoYBhgL/s144-o/z-texexp02.jpg” href=”https://picasaweb.google.com/109425650485415836391/6519222954477215633#6524996318526794242″ caption=”Daz StudioからZbrushへ-2″ type=”image” alt=”z-texexp02.jpg” image_size=”1500×772″ peg_single_image_size=”w500″ ]

9 ビューポートの反対側に複製されたサムネイルをクリックすると、テクスチャウィンドウが開くので、一番下にある「Export」ボタンを押す。

[peg-image src=”https://lh3.googleusercontent.com/-xMBeQwtF5LU/Wo1xlIs1jgI/AAAAAAAA6ik/WsNy41IQMPcZDmSNLVj2mJudIZIfTUTygCCoYBhgL/s144-o/z-texexp04.jpg” href=”https://picasaweb.google.com/109425650485415836391/6519222954477215633#6524996317934358018″ caption=”Daz StudioからZbrushへ-2″ type=”image” alt=”z-texexp04.jpg” image_size=”813×395″ peg_single_image_size=”w500″ ]

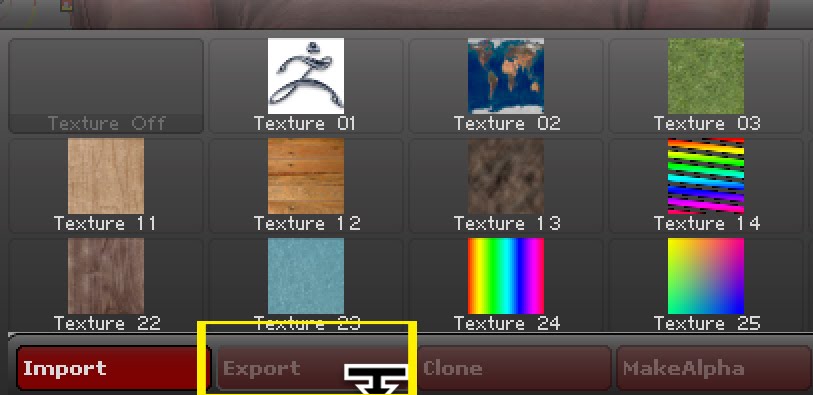
psd,png,JPGなどの形式でエクスポートできます。

タイトルとURLをコピーしました